Metal Roof Ridge Cap (Everything You Need To Know)
How Do You Cap the Ridge on a Metal Roof?
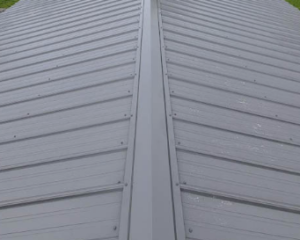
Capping the ridge on a metal roof is an essential step in the roofing process to ensure a weatherproof and visually appealing finish. The ridge cap covers the ridge, which is the highest point where two opposing roof slopes meet. Properly capping the ridge prevents water, debris, and pests from entering the roof structure and enhances the overall integrity of the roof.
What Length Does Metal Ridge Cap Come In?
The length of metal ridge cap can vary depending on the manufacturer and specific roofing system. Metal ridge caps are typically available in various lengths to accommodate different roof dimensions and designs. Common lengths range from 8 feet to 12 feet or more. Some manufacturers may also offer custom options, allowing you to obtain ridge caps tailored to your specific roof measurements.
Does My Roof Need a Ridge Cap?
Yes, your roof needs a ridge cap for several reasons. The ridge cap is a critical component that covers the ridge of a roof, where two slopes meet. It serves as a protective barrier against water penetration, preventing leaks and damage to the underlying structure. Additionally, the ridge cap enhances the aesthetic appearance of the roof, providing a finished and polished look. Without a ridge cap, your roof would be vulnerable to water infiltration and may lack a professional and complete finish.
What Goes on the Ridge of a Metal Roof?
The ridge of a metal roof requires the installation of a ridge cap. The ridge cap is specifically designed to cover the ridge, which is the highest point where two roof slopes meet. It serves multiple purposes, including:
- Weather protection: The ridge cap acts as a barrier against water, snow, and debris, preventing them from entering the roof structure.
- Leak prevention: By covering the ridge, the ridge cap helps to prevent water leaks at the roof’s highest point, where leaks are more likely to occur.
- Aesthetic enhancement: The ridge cap provides a finished and cohesive look to the roof by covering the exposed edges and creating a streamlined appearance.
The ridge cap is typically made of the same material as the metal roof panels, ensuring compatibility and a seamless integration into the overall roof design.
Do Screws Go on Ridge or Valley on a Metal Roof?
When installing a metal roof, screws are typically placed on the ridge rather than the valley. The ridge is the highest point where two roof slopes meet, while the valley is the lowest point where two slopes converge. Placing screws on the ridge has several advantages:
- Leak prevention: By placing screws on the ridge, the chances of water infiltration are minimized. The ridge is the topmost point, and water is less likely to pool or penetrate through screw holes.
- Aesthetics: Placing screws on the ridge creates a cleaner and more visually appealing roof surface. The metal panels on the slopes remain uninterrupted by visible screw heads, resulting in a smoother appearance.
- Structural integrity: Securing the metal panels with screws on the ridge ensures a strong connection. The ridge acts as a natural crest, distributing the weight and stress evenly along the roof slope. Placing screws in the valley may compromise the stability of the panels and the structural integrity of the roof.
- Debris management: Placing screws on the ridge helps prevent debris, leaves, and snow from accumulating around the screw heads, which can be problematic if located in the valley.
By placing screws on the ridge, you can maintain the functionality, aesthetics, and durability of your metal roof while minimizing the risk of leaks and damage.
Does Metal Ridge Cap Need to Be Sealed?
Yes, sealing the metal ridge cap is an important step in the installation process to ensure a watertight and weather-resistant roof. Properly sealing the ridge cap helps prevent water from penetrating the ridge and causing leaks, which could lead to costly damage to the roof structure and the interior of the building.
To seal the metal ridge cap, follow these steps:
- Clean the surface: Before applying the sealant, make sure the metal roof surface and the ridge cap are clean and free from dust, dirt, and debris. Use a brush or cloth to remove any loose particles.
- Choose the right sealant: Select a high-quality roofing sealant that is compatible with the metal roofing material. Silicone-based or polyurethane-based sealants are commonly used for metal roofs due to their excellent adhesion and durability.
- Apply the sealant: Use a caulking gun or a trowel to apply the sealant along the length of the ridge cap where it will come into contact with the metal roof panels. Ensure an even and consistent application to create a reliable seal.
- Position the ridge cap: Carefully position the ridge cap onto the roof ridge, aligning it properly with the edges of the metal roof panels. Press down gently to ensure proper contact between the ridge cap and the sealant.
- Secure the ridge cap: Fasten the ridge cap securely to the roof using screws or nails designed for metal roofing. Avoid over-tightening the fasteners to prevent damage to the metal or displacement of the sealant.
- Inspect and make adjustments: After securing the ridge cap, inspect the sealant for any gaps or inconsistencies. If necessary, add more sealant to ensure all gaps are adequately filled.
- Clean up: Wipe away any excess sealant around the ridge cap using a damp cloth or sponge to achieve a clean and professional finish.
Sealing the metal ridge cap is a critical step to ensure the long-term performance and protection of your metal roof. It adds an extra layer of defense against water infiltration, which is particularly important during heavy rain or snowfall.
How Do You Finish the Ends of a Metal Ridge Cap?
Finishing the ends of a metal ridge cap is essential to create a neat and professional appearance while providing additional protection for the exposed edges. Properly finishing the ends prevents water, debris, and pests from entering the ridge cap and improves the overall weather resistance of the roof.
The method for finishing the ends of a metal ridge cap may vary depending on the type of metal roofing system and ridge cap design. Here are general steps to finish the ends:
- Trim the ridge cap: Begin by measuring the length of the ridge cap needed to cover the entire ridge. Use metal snips or a saw to trim the ridge cap to the appropriate size. Ensure that the cut is clean and precise.
- Overlapping the ends: If your ridge cap is designed to overlap, position the first ridge cap segment in place and secure it to the roof ridge with appropriate fasteners. When installing the next segment, allow it to overlap the first one, usually by a few inches. Continue this overlapping pattern until you reach the end of the ridge.
- Cutting the final segment: When you reach the end of the ridge, measure the remaining space to fit the final ridge cap segment. Trim the last segment accordingly, ensuring it aligns with the ridge’s end.
- Securing the final segment: Attach the final ridge cap segment to the roof ridge using the appropriate fasteners. Be careful not to over-tighten the screws or nails to prevent damage to the metal or the ridge cap.
- Seal the edges: To provide an additional layer of protection against water infiltration, apply roofing sealant along the edges where the ridge cap segments meet. This helps create a watertight seal and prevents water from seeping between the segments.
- Smooth and clean up: Once all segments are securely fastened, inspect the ridge cap for any rough edges or excess sealant. Use a damp cloth or sponge to clean up any excess sealant and achieve a smooth finish.
Properly finishing the ends of a metal ridge cap ensures a clean and polished appearance while enhancing the roof’s overall weather resistance. It also helps to maintain the longevity and functionality of the ridge cap and the roof as a whole.
Does a Metal Roof Need a Ridge Vent?
A ridge vent is not a mandatory component for a metal roof, but it can be a valuable addition to enhance the roof’s ventilation and overall performance. Ridge vents are typically used in conjunction with intake ventilation systems, such as soffit vents, to create a balanced and efficient airflow within the attic or roof space.
Here are some considerations regarding the need for a ridge vent in a metal roof:
- Ventilation benefits: Proper ventilation is essential for regulating temperature and moisture levels within the attic or roof space. Ridge vents, along with intake vents, facilitate the movement of air, allowing hot and humid air to escape from the top of the roof while cooler air is drawn in from the bottom.
- Condensation prevention: Proper ventilation helps reduce the risk of condensation buildup in the attic or roof space, which can lead to mold growth and wood rot.
- Energy efficiency: Effective ventilation can contribute to better energy efficiency by reducing the heat trapped in the attic, which can impact the cooling requirements of the building.
- Climate considerations: The need for a ridge vent may vary based on the climate and local building codes. In regions with hot and humid climates, ridge vents can be particularly beneficial in maintaining a comfortable indoor environment and preserving the roof’s integrity.
However, it’s important to note that not all metal roofing systems are designed to accommodate ridge vents. Some metal roof profiles may not be suitable for ridge vent installation or may have other ventilation solutions built into their design.
If you are considering adding a ridge vent to your metal roof, consult with a roofing professional to determine the compatibility of your roof and the most appropriate ventilation options for your specific climate and building requirements.
How Do You Install a Ridge Cap?
Installing a ridge cap on a metal roof is a critical part of the roofing process, ensuring the roof’s weatherproofing and providing a clean and finished appearance. The ridge cap covers the ridge, which is the highest point where two opposing roof slopes meet.
Here’s a step-by-step guide on how to install a ridge cap on a metal roof:
- Measure and cut the ridge cap: Begin by accurately measuring the length of the ridge that needs capping. Use metal snips or a saw to cut the ridge cap to the required size. Ensure that the ridge cap aligns properly with the edges of the metal roof panels.
- Prep the roof: Before installing the ridge cap, make sure the metal roof surface is clean, dry, and free from any debris. Remove any old roofing material or loose screws that could interfere with the installation process.
- Apply sealant: To provide an additional layer of protection against water infiltration, apply roofing sealant along the ridge line. This helps create a watertight barrier and prevents leaks during heavy rain or snow.
- Position the ridge cap: Carefully position the cut ridge cap over the ridge line, ensuring that it aligns properly with the roof slopes. Gently press down to ensure proper contact between the ridge cap and the sealant.
- Secure the ridge cap: Use appropriate screws or nails designed for metal roofing to secure the ridge cap in place. Be careful not to over-tighten the fasteners to prevent damage to the metal or the ridge cap. The spacing of the fasteners will depend on the specific metal roofing system and the manufacturer’s recommendations.
- Overlapping and interlocking: Depending on the type of metal roofing system, some ridge caps may have an overlapping or interlocking design. If applicable, follow the manufacturer’s guidelines to ensure the ridge cap segments fit together securely.
- Seal the edges: To further enhance the ridge cap’s weather resistance, apply roofing sealant along the edges where the ridge cap segments meet. This helps create a tight seal and prevents water from seeping between the segments.
- Inspect and make adjustments: Once the ridge cap is in position and secured, inspect it for any gaps or inconsistencies. Make any necessary adjustments to achieve a clean and professional finish.
- Clean up: Wipe away any excess sealant and clean the area surrounding the ridge cap to achieve a tidy appearance.
Installing a ridge cap properly is crucial to ensuring a well-protected and long-lasting metal roof. If you are unsure about the installation process or have a complex roofing system, it is recommended to seek assistance from a professional roofing contractor.
How Do You Join a Roof Ridge?
Joining a roof ridge involves connecting the two opposing roof slopes at the highest point of the roof to form a secure and weatherproof ridge line. Properly joining the roof ridge is essential to ensure the structural integrity and weather resistance of the roof.
The method of joining a roof ridge can vary depending on the type of roofing material and the specific design of the roof. For metal roofs, the process typically involves overlapping the metal panels at the ridge and securing them together with fasteners.
Here’s a general guide on how to join a roof ridge for a metal roof:
- Prep the roof: Before joining the roof ridge, ensure that the metal roof panels on each slope are properly installed and aligned. The roof surface should be clean and free from any debris or obstructions.
- Cut the panels: Measure the length of the ridge and cut the metal roof panels accordingly to fit each slope. Use metal snips or a saw to make precise cuts.
- Overlapping the panels: Place one panel from each slope onto the ridge so that they overlap each other. The amount of overlap will depend on the specific metal roofing system and the manufacturer’s recommendations.
- Secure the panels: Use appropriate screws or nails designed for metal roofing to secure the overlapping panels together. Fasten the panels along the ridge line, making sure not to over-tighten the fasteners.
- Apply sealant: To ensure a watertight seal, apply roofing sealant along the joint where the panels overlap. This will help prevent water infiltration and potential leaks at the ridge.
- Inspect and make adjustments: After joining the roof ridge, inspect the ridge line for any gaps or loose fasteners. Make any necessary adjustments to achieve a secure and uniform connection.
- Finishing touches: Trim any excess metal and clean up the area around the ridge line to achieve a neat and polished appearance.
Properly joining the roof ridge is crucial for the overall performance and longevity of a metal roof. It ensures that the ridge is well-protected against the elements, preventing water, debris, and pests from entering the roof structure.
Do Metal Roofs Need Air Gap?
Metal roofs generally do not require an air gap, but it depends on the specific metal roofing system and the building’s design. An air gap, also known as a ventilation space or air space, is a gap left between the metal roof panels and the roof deck. It allows for airflow between the roof and the underlying insulation or sheathing.
The need for an air gap in a metal roof depends on various factors, including the type of insulation, climate, and local building codes. Some metal roofing systems may have built-in ventilation features that eliminate the need for a separate air gap.
The purpose of an air gap in roofing is to address potential moisture issues and improve energy efficiency. It helps prevent condensation from forming on the underside of the roof by allowing moist air to escape and be replaced by drier air. In colder climates, proper ventilation can also help prevent ice dams from forming on the roof.
However, when installing a metal roof with insulation, it is essential to follow the manufacturer’s guidelines and local building codes regarding ventilation requirements. Some insulation materials may require a specific type of ventilation, while others may not need an air gap at all.
Ultimately, the decision to incorporate an air gap into a metal roof should be based on a thorough understanding of the roofing system, insulation, and local climate conditions. If you are unsure about ventilation requirements for your metal roof, consult with a roofing professional to ensure that your roof is properly ventilated and performing optimally.
When Should You Not Use a Ridge Vent?
While ridge vents can be beneficial in most roofing scenarios, there are situations where using a ridge vent may not be appropriate or effective. Here are some instances when you should consider not using a ridge vent:
- Incompatible roof design: Some roofing systems, especially certain metal roofing profiles, may not be compatible with ridge vents. The roof design and slope may not allow for proper airflow or may hinder the effectiveness of a ridge vent.
- Low slope roofs: Ridge vents are more effective on roofs with steeper slopes. On low slope roofs, the natural airflow may be insufficient to facilitate proper ventilation through a ridge vent.
- Insufficient intake ventilation: Ridge vents work best when paired with intake ventilation, such as soffit vents or eave vents. If there is inadequate intake ventilation, a ridge vent may not function optimally and may not provide sufficient airflow.
- Climate considerations: In regions with consistently high winds, heavy rains, or snow accumulation, a ridge vent may allow excessive water or snow infiltration. In such cases, alternative ventilation solutions may be more suitable.
- Roof shape and complexity: On roofs with multiple ridges or complex designs, a ridge vent may not effectively ventilate the entire roof space. Alternative ventilation methods, such as gable vents or roof vents, may be more practical in such situations.
- Other ventilation systems in place: If your roof already has an effective ventilation system, such as a power vent or static vent, adding a ridge vent may not be necessary and could disrupt the balance of airflow.
- Building codes and regulations: Local building codes may dictate specific ventilation requirements, and there may be instances where a ridge vent is not allowed or is not the best solution to comply with these codes.
Before deciding not to use a ridge vent, it’s essential to consult with a roofing professional or an architect to evaluate the specific requirements of your roof and determine the most suitable ventilation solution for your building.
What Happens If You Don’t Vent a Metal Roof?
Failing to vent a metal roof properly can lead to several issues that can compromise the roof’s performance and longevity. Proper ventilation is essential for managing moisture, controlling temperature, and ensuring the structural integrity of the roof and the building.
Here are some consequences of not venting a metal roof:
- Condensation and moisture buildup: Without adequate ventilation, warm, moist air from the interior of the building can become trapped in the roof space. Over time, this trapped moisture can lead to condensation, which can cause wood rot, mold growth, and deterioration of insulation.
- Heat buildup: In hot climates, lack of ventilation can result in excessive heat buildup in the roof space. This can increase cooling costs and potentially damage the roofing materials due to prolonged exposure to high temperatures.
- Ice dams and snow retention: In colder climates, inadequate ventilation can contribute to the formation of ice dams on the roof. Ice dams occur when snow on the roof melts and refreezes at the eaves, leading to water backup and potential roof leaks.
- Reduced energy efficiency: Improper ventilation can result in higher energy consumption for cooling and heating, as the trapped heat or cold in the roof space can transfer to the interior of the building.
- Reduced roof lifespan: Moisture-related issues and temperature fluctuations can accelerate the deterioration of the roofing materials. Over time, this can lead to premature wear and reduce the overall lifespan of the metal roof.
- Increased risk of roof damage: Excessive heat, moisture, and ice dams can weaken the roof’s structure and integrity, making it more susceptible to damage from storms, wind, and other environmental factors.
- Decreased indoor air quality: Without proper ventilation, trapped moisture can promote the growth of mold and mildew, negatively affecting the indoor air quality and potentially causing health issues for the building’s occupants.
- Warranty voidance: Many metal roofing manufacturers require proper ventilation as part of their warranty terms. If the roof experiences issues due to inadequate ventilation, the warranty may be voided, leaving the building owner responsible for any repair or replacement costs.
To avoid these potential problems, it is essential to ensure proper ventilation for your metal roof. Consult with a roofing professional to determine the most suitable ventilation system for your specific roof design and climate conditions. Common ventilation options for metal roofs include ridge vents, soffit vents, gable vents, and roof vents.
What Are the Two Biggest Concerns to a Metal Roof If You Don’t Have a Roof Ridge?
If your metal roof lacks a ridge cap, two significant concerns arise, which can compromise the roof’s performance and longevity:
- Water infiltration and leaks: The ridge is the highest point on the roof where two opposing slopes meet. Without a ridge cap to cover and seal this junction, rainwater, snowmelt, and other precipitation can easily enter the roof structure. This can lead to leaks, water damage, and deterioration of the roofing materials over time. Water infiltration may not only affect the roof but also damage the building’s interior, resulting in costly repairs and potential disruption of daily operations.
- Aesthetic and finishing issues: The ridge cap provides a clean and polished finish to the roof by covering the exposed edges and joining the two roof slopes seamlessly. Without a ridge cap, the roof’s appearance may lack a professional and cohesive look. The exposed ridge line can appear unfinished and detract from the overall curb appeal of the building. Additionally, without a ridge cap, fasteners and raw edges may be visible, further compromising the roof’s aesthetics.
In summary, a roof ridge cap is a critical component of a metal roof, providing essential protection against water infiltration and enhancing the roof’s overall appearance. Without a ridge cap, water leaks and aesthetic issues become significant concerns, potentially leading to costly repairs and reduced property value. It is crucial to ensure that your metal roof is properly capped at the ridge to maintain its integrity and performance over time.